When it comes to managing a WordPress website, there are various factors that contribute to its optimal performance. One critical aspect is the maximum execution time, which determines how long a script can run before it times out. If you find yourself facing issues related to exceeding the maximum execution time limit, it’s important to address the problem promptly to ensure your website functions smoothly. In this article, we will explore the steps you can take to increase the maximum execution time for your WordPress site and keep it running efficiently.
Table of Contents
Understanding Maximum Execution Time:
Maximum execution time refers to the length of time a script or process is allowed to run before it is terminated by the server. This restriction exists to prevent scripts from consuming excessive server resources and causing performance issues. However, certain tasks, such as plugin installations, theme updates, or complex database queries, may require more time to execute. By increasing the maximum execution time, you can ensure these processes complete successfully without interruptions.
Step 1: Identify the Current Maximum Execution Time Limit:
Before you begin adjusting the maximum execution time, it’s crucial to determine the current limit set on your WordPress site. To find this information, you can use the WordPress Plugin “WP Maximum Execution Time Exceeded” This plugin will display the maximum execution time limit set on your site and notify you if it exceeds the recommended value.
Step 2: Accessing Your WordPress Site’s Files:
To modify the maximum execution time, you will need to access your WordPress site’s files. There are two ways to accomplish this, choose the method that you are most comfortable with and proceed to the next step.:
- via FTP (File Transfer Protocol) or
- Through the cPanel file manager provided by your hosting provider.
Step 3: Locate the wp-config.php File:
Once you have accessed your WordPress site’s files, locate the “wp-config.php” file in the root directory. This file contains essential configuration settings for your website.
Step 4: Edit the wp-config.php File:
Make a backup of the “wp-config.php” file before proceeding with any modifications. This step is crucial to ensure you can revert to the original configuration if any issues arise.
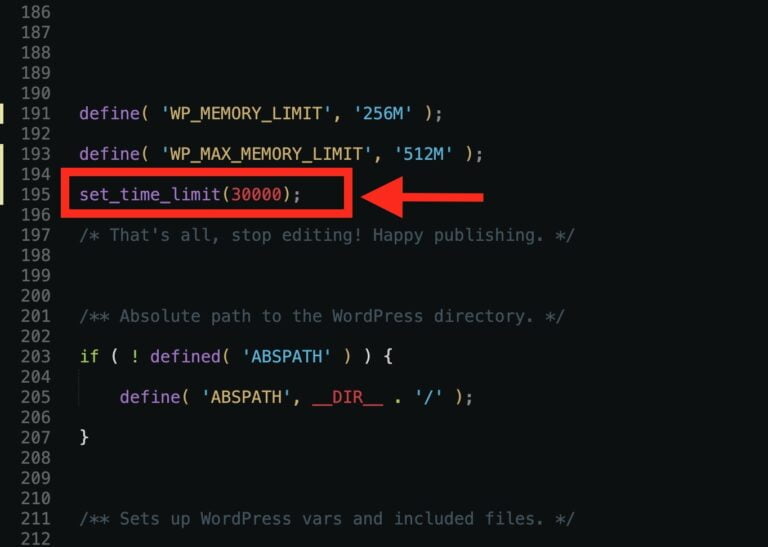
Open the “wp-config.php” file in a text editor and add the following code just before the line that says “That’s all, stop editing! Happy blogging.”
set_time_limit(300);
This code snippet increases the maximum execution time to 300 seconds (5 minutes). You can adjust the value as per your requirements. However, it is recommended not to set an excessively high value as it might strain your server resources.
Step 5: Save and Upload the File:
After adding the code, save the changes made to the “wp-config.php” file and upload it back to your server, replacing the existing file. Ensure that you are overwriting the correct file and maintaining the file permissions during the upload process.
Step 6: Verify the Maximum Execution Time:
Once you have uploaded the modified “wp-config.php” file, it’s time to verify if the changes have taken effect. You can use the “WP Maximum Execution Time Exceeded” plugin again to check the maximum execution time limit. It should now reflect the updated value.
Conclusion:
By following these steps, you can increase the maximum execution time for your WordPress site, allowing resource-intensive tasks to complete successfully without encountering timeout errors. Remember to exercise caution while modifying important files, and always make backups to avoid any unintended consequences. By ensuring an adequate maximum execution time, you can optimize the performance of your WordPress site and provide a seamless user experience for your visitors.


