- Generating Idea & Game Design
- Creating Unity Project – GIT
- Animation in Unity
- Unity Programming(Part 1)
- How to make money from game
- Publishing game on app stores (Microsoft Windows phone, windows store, android)
- Marketing Tactics
- What’s next
In the previous tutorial, we have seen how to create project in Unity using GIT. In this tutorial, we shall be making use of game design from tutorial 1. So you need to have those images with you in order to continue making animation here in this tutorial. Unity animation is similar to video animation or any other animation program. For this unity project, we used photoshop with no cartoon software or any other 2d or 3d animation software. I’ll keep this unity animation tutorial, as simple as possible.
Table of Contents
Unity 2D Game tutorials list:
This complete game development series is divided into following different parts:
- Generating Idea & Game Design (characters, scenes and stuff)
- Creating Unity Project – GIT
- Animation in Unity
- Unity Programming(Part 1)
- How to make money from game
- Publishing game on app stores (Microsoft Windows phone, windows store, android)
- Marketing Tactics
- What’s next
What’s in this tutorial?
- Adding images to scene
- Animation in Unity
- Adding Buttons/Titles
- Adding Background
- Project Files
Adding images to scene/hierarchy:
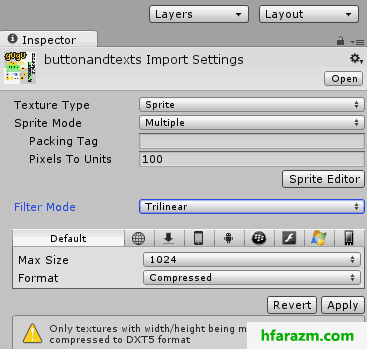
You have images(from tutorial 1) in your project which you have not yet added to scene or hierarchy of your unity project. Lets add them to make animation in unity. Single click on buttonsandtext.png image and in the right panel(Inspector) change settings according to following image and then click sprite editor:
After clicking sprite editor you will see this:
![]()
Explanation:
- Click on top left of sprite editor and select slice. A small menu will pop up, basically it says “should I slice all images automatically?”. Yes, we need to slice them automatically as I have arranged them in a way that they do not overlap each other. For some images, this technique doesn’t go well and after clicking slice you may need to resize grayish rectangles manually and then click trim to do the job manually. But as I said earlier, this is not the case with every image.
- Click on slice in the popup. Now your images are sliced and you see rectangles around them. You can resize these rectangles if you want.
- Click apply and now all your images in that one image are separated.
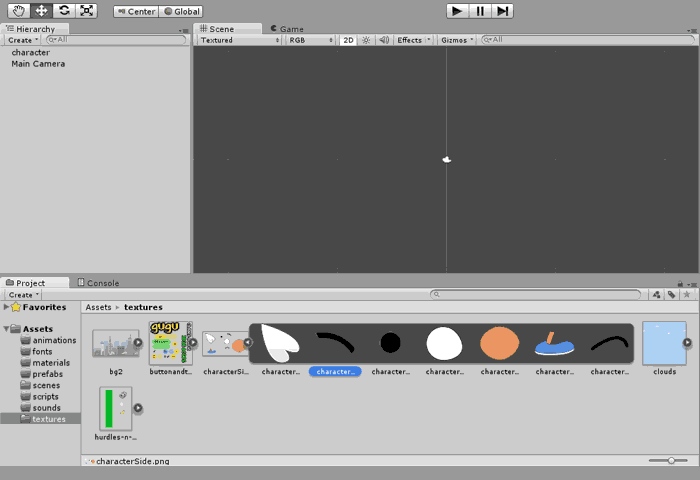
click arrow on the image in project to see all parts separated just like this:
![]()
icon-pause Your Task: Do the same for all the images except bg2.png and clouds.png in the project. Come back when you are done(Don’t worry if you feel difficulty, you will get everything done at the end of this tutorial).
In the unity menu, click on “GameObject” and then click “Create an empty object”. Empty object is just like a folder that holds other game objects. Right click to rename this empty game object to “character” because this game object will hold face, eyes, eyebrows etc of our game character.
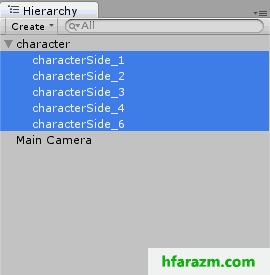
Expand the characterSide.png image in project, select one part of it at a time then drag and drop it from project to hierarchy panel. Do this for all separated parts except characterSide_0 and characterSide_5, this is what I am saying:
Now select all 5 images in hierarchy panel (which you have just dropped in). Drag and drop it on the “character” object. You will now see your gameobject like this:
Change their names so that we may know which part is eye or eyebrow. Click on each characterSide_* image in hierarchy to see it in right bottom of unity and then right click on image in hierarchy to change its name to something appropriate. I have changed their names like this:
eyebrow, eyeball, face, lips, whiteEye
Now click on “face” and in the inspector(right panel) change its z-position to 5. Change z-position of whiteEye to 4.
Next drag whiteEye to upper left of the face, eyeball at the center of whiteEye, eyebrow to the top of whiteEye. When you are done with this, select whiteEye, eyeball and eyebrow in hierarchy by holding ctrl. Then right click on them to duplicate those three images. While those duplicated images are highlighted, in the inspector under transform, rotate them 180 degree at y-axis. reposition it to right side of face. You will see both eyes. Transform accordingly if something is not right. your final character will somehow look like this now:

Though i have repositioned and rotated eyebrow a little bit. And changed the duplicated names of eyeball to LeftEyeBall and RightEyeBall, whiteeye to LeftWhiteEye and RightWhiteEye, Eyebrow to LeftEyeBrow and RightEyeBrow. Changing names are important because same names will create difficulty later while creating animation in unity.
Animate Character:
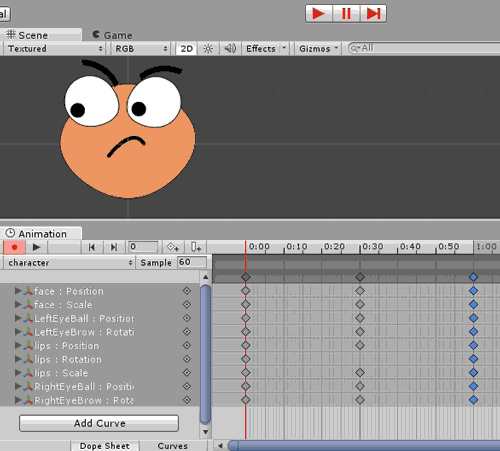
Select the character(the parent object). In the unity menu, goto Window > Animation. Then in animation window, click on “Add curve”. A file dialog will appear, save your animation in animation folder and name it “Character”. Your unity buttons will turn red. This means that unity has started recording animations for character and its children objects(this is why I created empty gameObject).
In the animation window, click exactly at 0:30 (half second) so that your time bar (red bar) moves to that position.
- Select RightEyeball on the RightWhiteEye and move it to the right(do not move it away from RightWhiteEye). You will notice small diamonds appear at timeline, which show that the animation is being recorded.
- Move your timebar back to 0:00 and RightEyeBall to the left while keeping it inside RightWhiteEye.
- Play the animation in animation windows by clicking on icon-play button. Here you have your first animation done. Do the same for LeftEyeBall.
- You may want to add animations for other parts of character this way such as movement of eye brows, lips and face etc. But in the process, your starting point must be zero and ending point must be 0:30 for every part.
- After you are done animating or not animating other parts, select all diamonds at 0:00, press Ctrl+C to copy them and move your timebar at 1:00 and then paste (ctrl+V) diamonds there. This is a technique for smoothing animation in loop. What it does is, goes back to its initial state and then plays the animation without abrupt change.
- My final character animation looks like this(though its not smooth here in demonstration but in real game it will be):
Adding buttons
At the start of this tutorial, you have seen how to slice images using sprite editor plus you probably have done slicing of buttonsandtext.png. Expand that image in project, drag and drop the following images(highlighted 1 and 2) in the scene(drag 1st one 1st). Position them like this: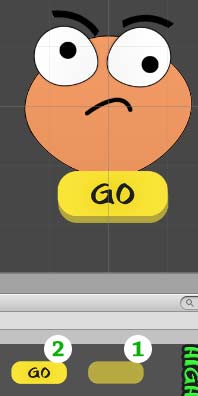
icon-pause Your Job: Add title to the scene. Just like you added the button.
Adding Background
- In the unity menu, click on GameObject > Create Other > Quad
- In the project, right click on Material folder > Create > Material. After creating material Rename it to clouds.
- Select material in the project and goto inspector panel, select Unlit > Texture from Shader drop-down.
- In the inspector, click on none(texture) box and select clouds image.
- Drag and drop Material on the Quad object that you created in the first step.
- Click on quad in hierarchy. In the inspector, transform its position to (0,0,5)
- Change quad scale to (10,10,1)
- Now your scene must look like this:

In this tutorial, you grabbed how to use add images and adding animation in unity with proper folder hierarchy and importing game design to your unity project. Next we will do some game programming to animate the background and some other essential tasks.
Hope you like it. Please share my work. Wait for next tutorial.