After taking this tutorial you must be able to Add Variable Products in Woocommerce site and able to create woocommerce attribute very easily. So let’s start to create some attributes and add variable products in woocommerce.
Variable product in woocommerce is a product type that allows you to add some characteristics like product type, product color, product size, product price and much more. It can be used for a product like a jacket, where you can offer size variations i.e small, medium, large and extra large. Let’s add some jacket sizes and prices in woocommerce
Table of Contents
Step 1. Set the product type
To add a variable product, edit an existing product in which you want to add variations.
- Go to: Dashboard > Products
- Click Edit on an existing product
- Scroll down to Product data (fig 1.1)
- Select “Variable product” from the product data drop-down.
- Update/publish product page.

Fig 1.1
Step 2. Add attributes
After setting product type, we add attributes, there are two type of attributes:
- Product specific attributes for single product.
- Global attributes for all products.
To add product specific attributes:
- Go to: Product data > Variable products > Attributes (see Fig 2.8 below)
- Select “Custom product attribute” and click Add button.
- Enter Name of the attribute (e.g. Size).
- Enter values (value(s):) of the attribute separated by | (e.g., S | M | L | XL) . (as shown in fig 2.8)
- Check the “Used for variations” checkbox and click save attributes button to save the attribute.

Fig 2.8
To add global attributes:
- Go to : Dashboard > Products > Attributes. (as shown in Fig 2.1)

Fig 2.1 - Add a new attribute by giving Name and slug for your attribute. (e.g. color). (as shown in Fig 2.2)

Fig 2.2 - Click Add attribute, to save the attribute.
- Now to add attribute values, choose Configure terms of that attribute. (as shown in fig 2.3)

Fig 2.3 - Enter Name, slug, and Description of the color and click Add new Color button to save the attribute values, (e.g. black, blue, green). (as shown in fig 2.4 & 2.5)

Fig 2.4

Fig 2.5 - Go to: Dashboard > Products > Edit product > Product data > Variable products > Attributes .
- Select “Color” (your globally declared attribute from the dropdown list of attributes) and click Add button. (as shown in Fig 2.6)

Fig 2.6 - Now select the values from the dropdown of value(s): (e.g. black, green, blue). (as shown in Fig 2.7)

Fig 2.7 - Check the “Used for variations” checkbox and click Save attributes button.
- Go to : Dashboard > Products > Attributes. (as shown in Fig 2.1)
Step 3. Add variations
Last step is to add variations, let’s do it.
- Go to Variations section in the Product Data block in the single product page
- Select Add variations from the dropdown and click GO Button. (as shown in Fig 3.1)

Fig 3.1 - Add Variations 4 times: the number of added variations should be equal to the number of attribute values (e.g. Sizes) you have. (e.g. I have 4 size S | M | L | XL) then I will Add variation 4 times. (as shown in Fig 3.2)

Fig 3.2 - Select S (small )from the dropdown menu of the first variation, M (medium) for second and so on… (as shown in Fig 3.3)

Fig 3.3 - In order to change additional data (e.g. set price), Select attribute value (e.g. S) and click the triangle icon on the right side to expand the variation block.
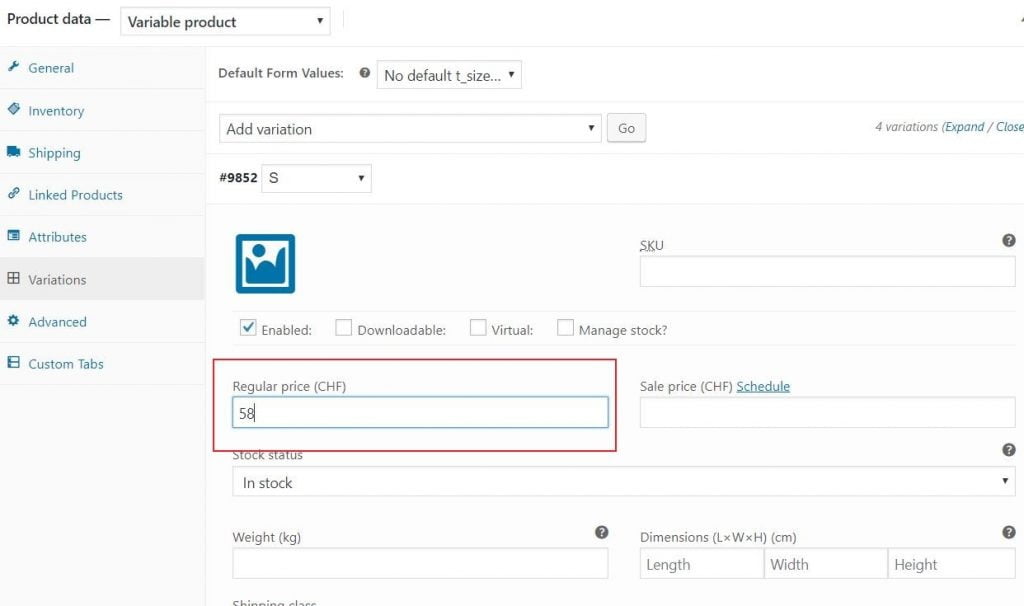
- Write the price for each size. (as shown in Fig 3.4)

Fig 3.4 - Save Changes and Update page.
You have successfully added the variable product, with attributes and variations. Having issue? comment below or click here to contact us


