Do you Want to fix the error in WordPress maximum upload file size. Then check out this tutorial
WordPress Maximum upload file size ranges from 2MB to 150MB depending on the settings of your web hosting provider is giving by default. This error occurs sometimes when you try to upload or install plugins, themes, and files that are larger than a given size. In order to check your current maximum upload file size:
- Go to : Dashboard > Media > Add New
- Maximum upload size: 5Mb is your current upload size.

There are several methods to increase your maximum upload size.
1. Fix WordPress Maximum Upload File Size Using Plugin
- Dashboard > Plugins > Add New > Search plugins.
- Write increase upload max filesize in the search.

- Click Install Now and Activate the plugin.

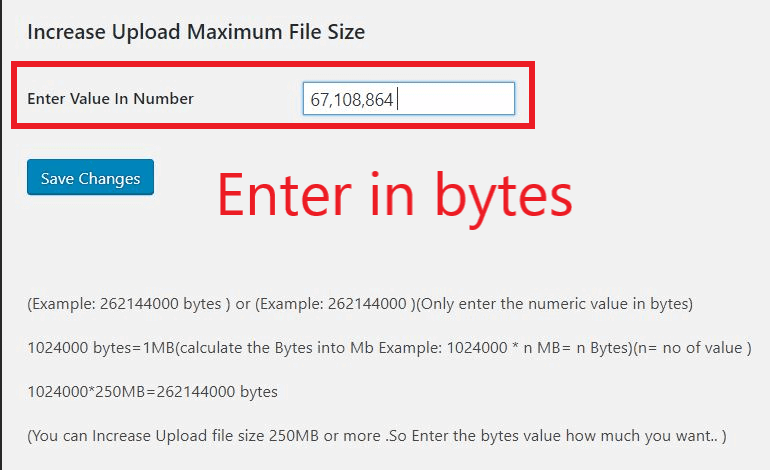
- Go To Dashboard > Upload Max File Size
- Enter the size but in Bytes only ( e.g. 64 Mb = 67,108,864 Bytes )

- Click Save Changes to apply new upload size and check Maximum Upload size again.
2. WordPress Maximum Upload File Size by Theme Function
- Go to: Dashboard > Appearance > Theme Editor/ Editor.
- Choose your theme name and Click select.

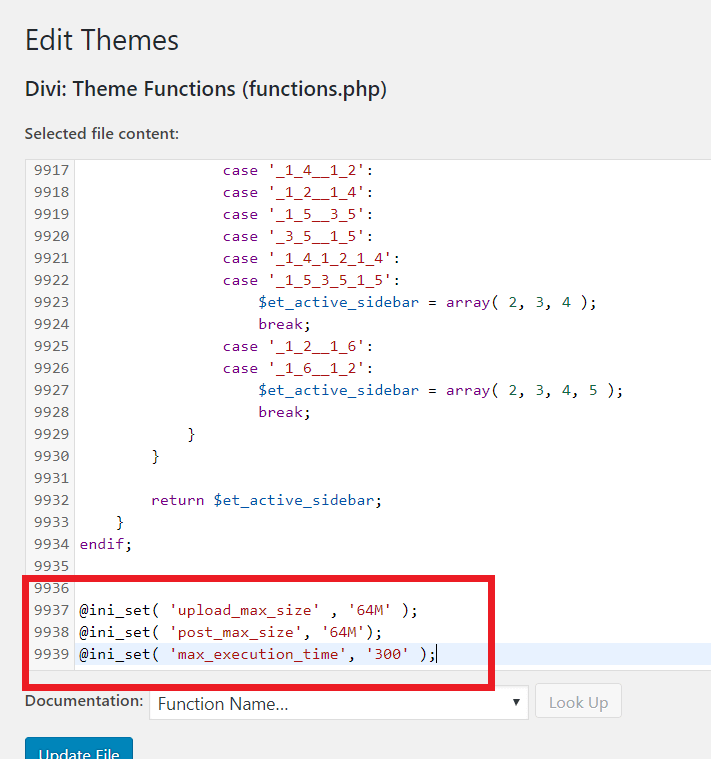
- Go to : Theme Functions > funtions.php

- Copy
@ini_set( 'upload_max_size' , '64M' );
@ini_set( 'post_max_size', '64M');
@ini_set( 'max_execution_time', '300' );
Scroll all the down and paste this on a new line.

- Click Update to apply new upload size and check Maximum Upload size again.
3. Using Php.ini
- Dashboard > plugins > Add New > Search
- Install & Activate File Manager plugin.
- Dashboard > Wp File Manager
- Edit wp-confg.php in the root directory.
- Add the following code before /* That’s all, stop editing! Happy blogging. */:
@ini_set( 'upload_max_size' , '64M' );
@ini_set( 'post_max_size', '64M');
@ini_set( 'max_execution_time', '300' );
- Click Save & Close to apply new upload size and check Maximum Upload size again.
- or
- Create/ Edit php.ini in the root directory – if you’re on shared hosting then you’ll not see in php.ini, create a file name php.ini.
- Add the following Code
upload_max_filesize = 64M
post_max_size = 64
Mmax_execution_time = 300
post_max_sizeshould be greater than or equal toupload_max_filesize.- Click Save & Close to apply new upload size and check Maximum Upload size again.
Hope this tutorial is helpful to you, kindly share. Thanks.
Having issue? comment below or click here to contact us


