This is the third tutorial of learning chrome developer tools shortcuts or inspect element tricks. In this tutorial, we are going to learn about the HTML inspector. The last tutorial was about customizing chrome DevTools. This tutorial is in two parts In the first part of this tutorial we will cover HTML inspector and in the second part of this tutorial we will cover CSS in elements panel.
Before beginning this tutorial, it is important to note that any change you make in Elements panel is temporary and may differ from what you have written actually in your web page. Now let’s start!
Table of Contents
What is Elements Panel?
In chrome DevTools, the very first panel from left is elements panel which helps us to:
- Inspect HTML tags representing DOM
- View CSS applied to elements

How to Inspect an HTML Element in DevTools?
To inspect an element or to know the HTML of an item in web page, right click on the element and select Inspect from the context menu(Picture 3.2). For example, in the following picture, I have clicked on DevTools and selected inspect in Chrome. The elements panel then open and shows the HTML behind that element.
Another way to inspect an element is Press Ctrl + Shift + C (Windows) or Cmd + Shift + C (Mac) to open DevTools in Inspect Element mode, then hover over an element
Useful info about HTML tag
When you inspect an element in DevTools, it gives a lot of information and control over selected HTML tag or web page item. We can examine the following with inspect element:
1. Hover over HTML tag
When you hover over selected HTML tag it shows,
- Tag Name
- Class or ID (if applied)
- Exact dimension of that tag.
- Margin in orange highlight
- Padding in green highlight
- Border in yellow highlight
- Actual content area in blue highlight
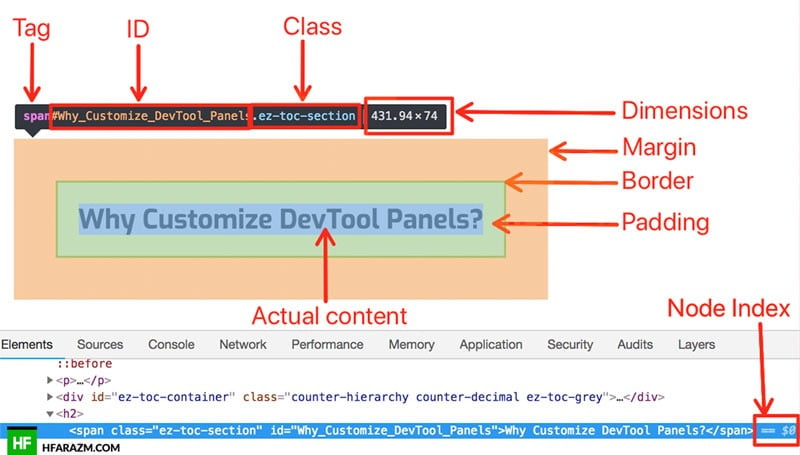
- == $0 shows the current node index. Means if you have to check which tag you selected earlier then you goto console panel and write $1 for the previous selection and then further down to $2, $3 and so on(Picture 3.4).

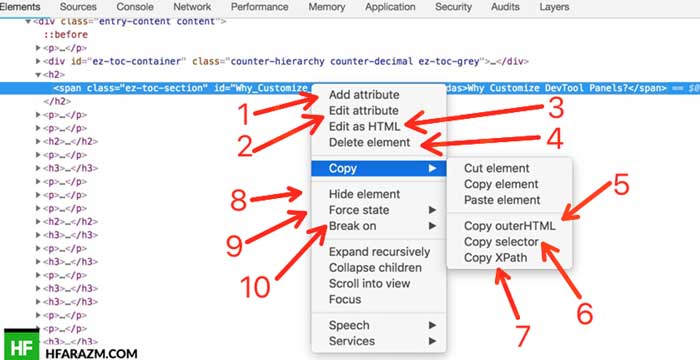
2. Right Click on HTML tag
When you right-click on selected HTML tag, we can further perform actions, most actions are self-explanatory, I will try to explain some below:
- Add attribute such as ‘style’ or ‘class’ attribute.
- Edit attribute such as ‘style’ or ‘class’ attribute.
- Edit as HTML let us edit HTML of selected tag, whether attributes, properties.
- Delete is self-explanatory.
- Copy outerHTML and copy element are identical.
- Copy Selector let us copy the ID or Class of tag
- Copy XPath let us copy the XSLT(Extensible Stylesheet Language Transformations) based syntax for selected tag used for XML, PDF and more.
- Hide element simply hides element, doesn’t delete it.
- Will be discussed in tutorial 4
- Break on triggers when javascript add, remove or modify a tag.
How to Navigate the DOM in HTML?
Navigate through the DOM structure using your mouse or keyboard. A collapsed node has an arrow next to it pointing right, an expanded node has an arrow next to it pointing down as shown in (Picture 3.6). You can expand/contract a node using mouse and keyboard, see below:

Using your mouse:
- Click once to highlight a node.
- To expand a node, double-click anywhere on it or click on the arrow next
to it. - To collapse a node, click on the arrow next to it.
Using your keyboard:
- Press the Up Arrow or Down Arrow key to select the node above or below the current one.
- Press the Right Arrow or Left Arrow key to expand or contract a node. Press it again to move to the first child of the expanded node. You can use this technique to quickly navigate deeply-nested nodes.
How we Edit DOM node and its children as HTML
You can edit a DOM node and its children as HTML:
- Open the more actions menu and select Edit as HTML (Picture 3.7).
- Press F2 (Windows / Linux) or Fn+F2 (Mac).
- Press Ctrl+Enter (Windows / Linux) or Cmd+Enter (Mac) to save your changes.
- Press Esc to exit the editor without saving.
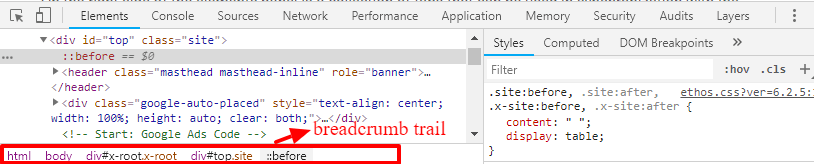
How to Navigate Breadcrumb Trail
At the bottom of the Elements panel is a breadcrumb trail. The node to the right is the current node. And to the left of that are its parent nodes. And so on, all the way up the tree.Navigating back up the structure moves the highlight. DevTools displays as many items as possible in the trail (Picture 3.8).
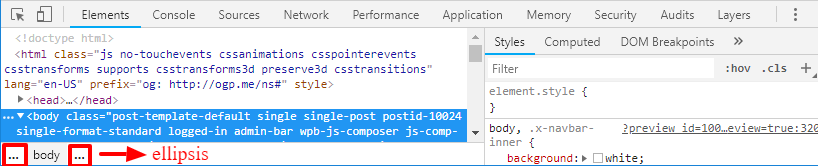
If the entire trail doesn’t fit in the status bar, an ellipsis (…) shows where the trail has been shorten. Click the ellipsis to show the hidden elements (Picture 3.9).
How HTML is compiled in Elements Panel?
We need to consider the following key points about HTML being compiled in elements panel:
- Once HTML is loaded from a web page. The HTML could be changed using JavaScript.Example: We can change the inner text of H2 heading using JavaScript easily.
- The HTML structure you have written in the file may differ from what appears in the browser’s HTML.Example: If you forgot to write closing </h2> tag then chances are, chrome will automatically add it for you.
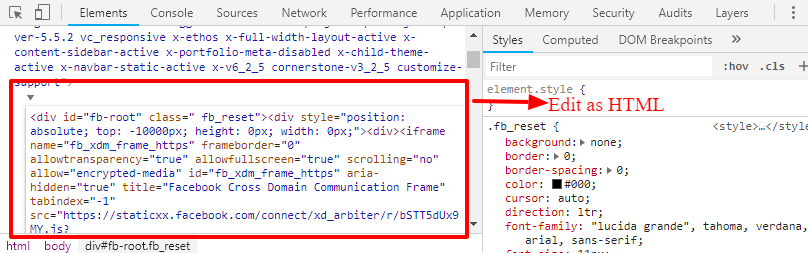
- The HTML could be loaded from an external source using iFrame.Example: If you have used an iframe in your web page and added its source Facebook.com then the source code of that link will also appear in the Elements panel along with your HTML code.
- Using a framework to induce content. (React or Angular e.t.c)Example: Reach might add its own attributes in your HTML for its operations.
Whats next?
In the next tutorial, we will dive deep into CSS section of elements panel in DevTools.
In this complete chrome DevTools course, all code files will be available at the end of each tutorial and there will be a quiz to test your knowledge. All available absolutely FREE.
Quiz
[wp_quiz id=”10633″]
Having issue? comment below or click here to contact us