This is the fourth tutorial of Learning Chrome Web Developer Tools course. In this tutorial, we are going to inspect CSS styles in elements panel of Chrome DevTools. The last tutorial was about Using Elements Panel (HTML) in which we covered the HTML. Now we are going to inspect CSS on the right of Elements panel.
Before beginning this tutorial, it is important to note that any change you make in Elements panel is temporary and may differ from what you have written actually in your web page. Now let’s start!
Table of Contents
What is Elements Panel?
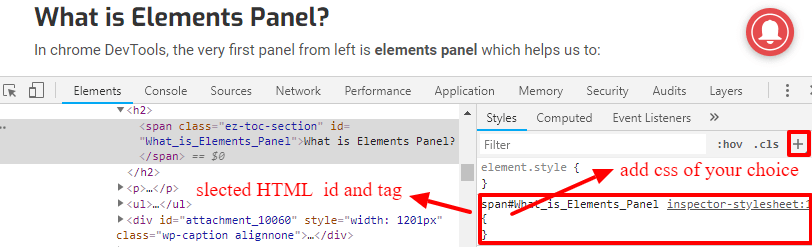
In chrome DevTools, the very first panel from left is elements panel which helps us to:
- Inspect HTML tags representing DOM
- View CSS applied to elements

How to Inspect a CSS Element in DevTools?
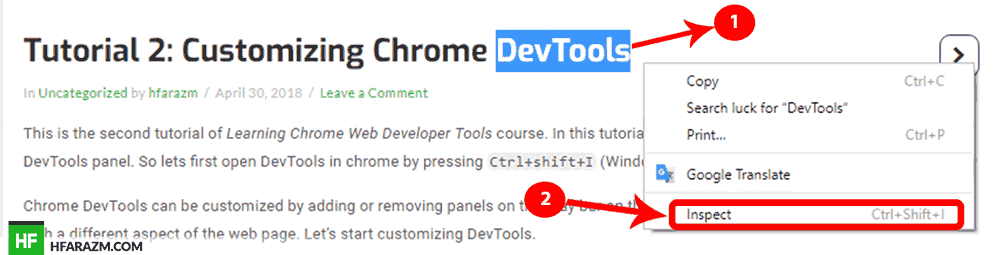
Inspecting CSS of an element is similar to HTML inspection. All we have to do it to right click on the element and select Inspect from the context menu(Picture 4.2). The elements panel then open HTML on the left and CSS on the right. For example, in the following picture, I have clicked on DevTools and selected inspect in Chrome.
Another way to inspect an element is Press Ctrl + Shift + C (Windows) or Cmd + Shift + C (Mac) to open DevTools in Inspect Element mode, then hover over an element
How to Inspect the styles tab?
On the right side of the elements panel is a collection of tabs that can be used in synchronization with the elements panel(Picture 4.3). The very first tab is styles tab which shows all the CSS style rules that are relevant or applied to the element currently selected in the elements panel. Also note that in styles tab there is a filter field and three buttons (:hov), (.cls), (+) on the top of the styles tab.

1. Filter Field
Filter field let you filter attributes applied to selected HTML tag. For instance, if you would like to find CSS styles for ‘strong’ HTML tag, instead of scrolling down in CSS styles and finding the styles applied to ‘strong‘ tag, you can simply write ‘strong’ in the filter field and it will show you tag-specific styles. This is applicable to class, id or any other attribute applied to HTML tag(Picture 3.3).
2. (:hov)
:hov is responsible for managing HTML element state e.g how HTML element will look when cursor hovers, or when element is clicked. All the available states can be freezed by clicking on checkboxes. With this you don’t have check hover over and over again and then style it. You simply check hover state, apply hover styles and thats it.

Hover:
state shows the CSS styles of an element when you hover your cursor over it.
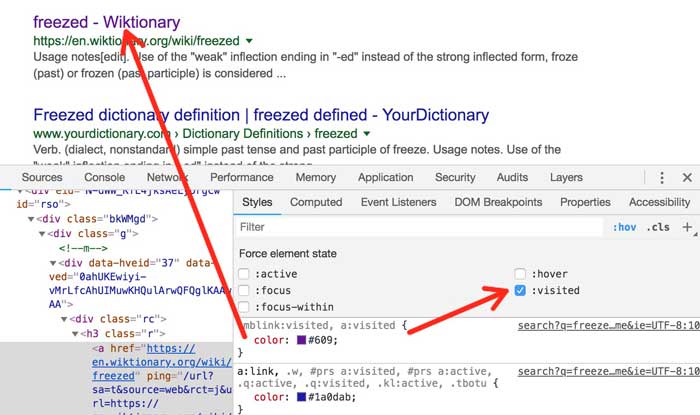
Visited:
state shows the CSS styles of an anchor tag when you have visited its href url. e.g on google when you visit a site it shows the URL in purple. (Picture 4.6)
active:
state shows the CSS styles of an element when you hold your cursor. It is important to note when cursor button is released this active states disables.
focus:
states shows the CSS styles of an element when you focus over an item in web page with tab key or mouse. For example, if you click on an input field, we can stylize it with borders and background color, etc.
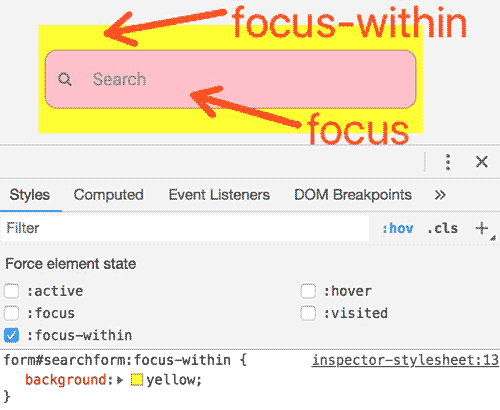
focus-within:
state shows the CSS styles of an element whose child’s state is focus. For example, we can set the style of FORM element when its child tag i.e input state is focus. As you can see in the picture below, when we focus on input field, the background of form also changes(Picture 4.8).
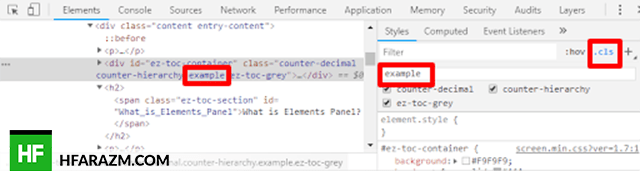
3. (.cls)
By clicking on the .cls button you can simply add or remove a class attribute directly in selected HTML in elements panel.
Example: When I click on the .cls button then it opens an input field where you can add a class name and it will show up in HTML tag on the left and if there are some classes already there, you can uncheck/check to add/remove from selected html tag (Picture 4.9).
4. (+)
When we select an HTML tag, click on this button (+) in styles tab, then it shows class, id or tag in CSS on the right side so that you can add more styles to it(Picture 4.8).It is important note here that, if we select an HTML tag which has many classes then it shows all the classes but if an HTML tag contains id along with class attribute then it shows the only id because it has higher priority.
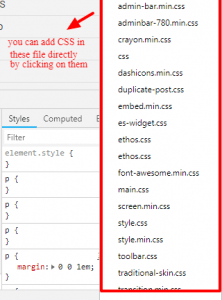
Now if you hold this button (+) with a left click then it shows a menu which shows all the stylesheets loaded with the webpage. You can also add CSS in a different stylesheet of a web page such as header, style.css,ethos.css,main.css etc(Picture 4.9).
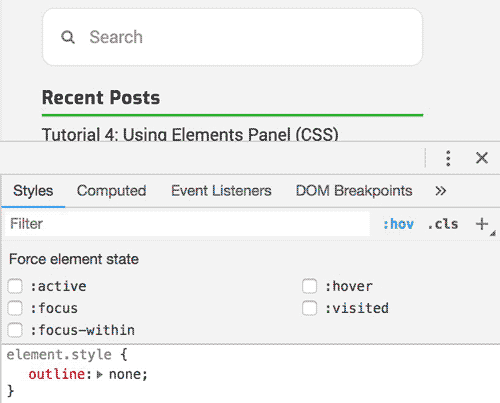
How to add inline styles?
We can add inline styles to any HTML tag by first selecting it then goto element.style on the right section to add more inline css styles; as shown in picture 4.10.

Note: You can change the format of any color by pressing Shift +Left Click on that color.
Where styles are located?
Another useful option in chrome is having the ability to see which file and line number holds the CSS styles. For example, on the top right corner of css styles, it shows filename followed by a colon that represents the line number which hold the styles being generated in DevTools. When you click on it, it takes you to sources panel and shows the exact line from where styles are generated.
Note: You can also open the source file and jump to the appropriate line of any CSS property name or value by pressing Ctrl + Left Click (Windows) or Cmd + click(Mac).
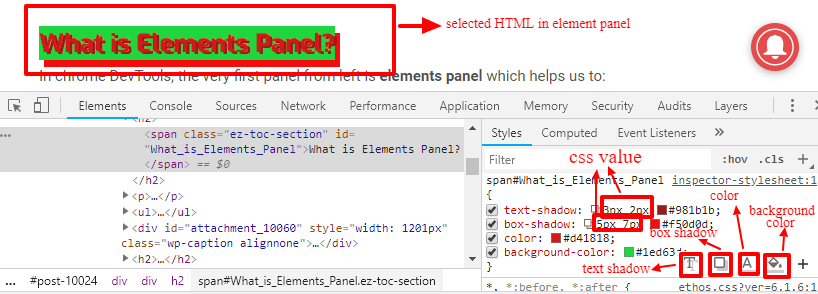
A hidden menu in CSS
When you move your cursor on the right side of any css style, three vertical dots show up on the right corner in the styles tab. And when you hover your cursor on these three vertical dots, it opens a menu. That menu show different options such as text shadow, box shadow, color and background color as shown in (picture 4.11).
Note: You can also increment and decrement any CSS property value by pressing Up and Down key from keyboard.
If you want to increment and decrement the CSS property value in floating point numbers such as 0.1 then press Alt+Up and Alt+Down keys from keyboard.
If you want to increment the value upto 10 then press Shift+Up and Shift+Down to decrement upto 10.
If you want to increment the value upto 100 then press Shift+Page Up (Windows, Linux) or Shift+Function+Up (Mac) and Shift+Page Down (Windows, Linux) or Shift+Function+Down (Mac) to decrement the value upto 100.
Box Model
In styles tab at the very bottom, we get a visual representation of a box model for the selected element, which can be really useful in debugging layout issues. In styles tab when you scroll down, at the end, you see the box model where you can change margin, border or padding of the actual content of selected HTML in elements panel(Picture 4.12). We already covered this in last tutorial.

Computed tab
Computed Tab which is located next to Styles tab. This tab shows the final styles applied to the HTML tag.

This is useful when you have multiple stylesheets and you are having difficulty understanding what styles are actually being implemented at the end(Picture 4.13).
In computed tab, when we click on the arrow left to any final style, it displays the stylesheet file name, line number of the style and a link to where it is located in styles tab.
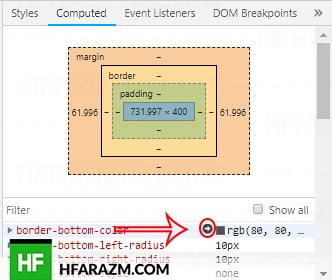
The CSS in computed tab can’t be edited but it can be changed in the elements tab or in the windows that open via the stylesheet filename link.
Quiz
[wp_quiz id=”10641″]
Having issue? comment below or click here to contact us