This is the fifth tutorial of Learning Chrome Web Developer Tools course. In this tutorial, we are going to cover the DOM tree view, DOM breakpoints and event listeners in the Chrome DevTools Elements panel. The last tutorial was about Using Elements Panel (CSS) in which we covered the CSS Styles tab and Computed tab.
Table of Contents
What is DOM?
The Document Object Model (DOM) defines your page structure. Each DOM node is a page element.
Example: a header node, paragraph node.
DOM breakpoints
DOM breakpoints are used to set DOM breakpoints to debug complex JavaScript applications.
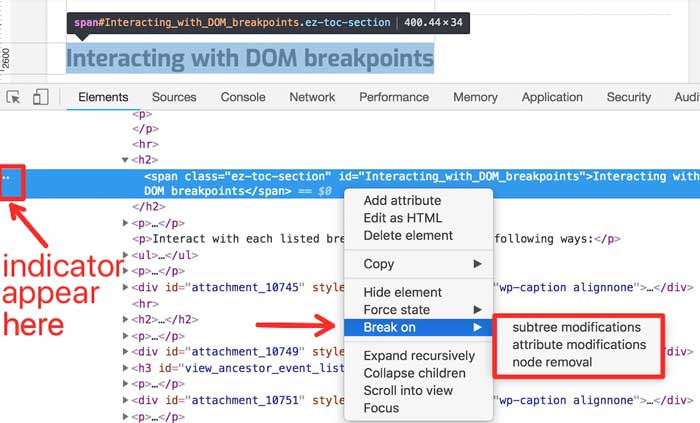
For example: if your JavaScript is changing the styling of a DOM element, set a DOM breakpoint to fire when the element’s attributes are modified (all examples are given below). You can trigger a DOM breakpoint on one of the following DOM changes:
- Subtree change
- Attribute change
- Node removal
1. Subtree Modifications
A subtree modification breakpoint is triggered when a child element is added, removed, or moved. To break an element whenever its child tag is modified, right click on the element and select Break on > Subtree Modification
For example: If you are adding a SPAN tag into an existing element such as #main-content. You can break the execution of following code whenever it tries to add a SPAN in the #main-content by right clicking on #main-content tag and selecting Break on > Subtree Modification.
// Take an element
var element = document.getElementById('main-content');

// Create a new element
var mySpan = document.createElement('span');

// Appends newly created element to existing
element.appendChild( mySpan );
2. Attribute Modifications
An attribute modification occurs when the attribute of an element (e.g class, id, name) is changed dynamically.
For example: If you are adding an active class into an existing element such as #main-content. You can break the execution of following code whenever it tries to add a CLASS in the #main-content by right clicking on #main-content tag and selecting Break on > Attribute Modification.
// Modifying the class attribute
element.className = 'active';
3. Node Removal
A node removal modification is triggered when the node in question is removed from the DOM.
For example: If you are removing an element such as #main-content. You can break the execution of following code whenever it tries to remove an element in the #main-content by right clicking on #main-content tag and selecting Break on > Node Removal.
//Removing the element
document.getElementById('main-content').remove();
Interacting with DOM breakpoints
The Elements and Sources panels(sources panel will be discussed later) both include a tab for managing your DOM breakpoints. Each breakpoint is listed in DOM Breakpoints tab with an element identifier and the breakpoint type as shown in (Picture 5.2).

Interact with each listed breakpoint in any of the following ways:
- Hover over the element identifier to show the element’s corresponding position on the page (similar to hovering over nodes in the Elements panel).
- Click an element to select it in the Elements panel.
- Toggle the checkbox to enable or disable the breakpoint.
When you trigger a DOM breakpoint, the breakpoint is highlighted in the DOM Breakpoints pane.
Element Event Listeners
The JavaScript event listeners associated with a DOM nodes are placed in the Event Listeners pane.
For example: Suppose you have an input field that has a JS function of keyup and you need to find where it is defined, then you need to select input field’s HTML node and goto event listener tab. It will show you all the event associated with that selected HTML node. You can then click on event type e.g key up then right click on the handler to goto function definition in sources panel. We will discuss sources panel in detail in next tutorials.
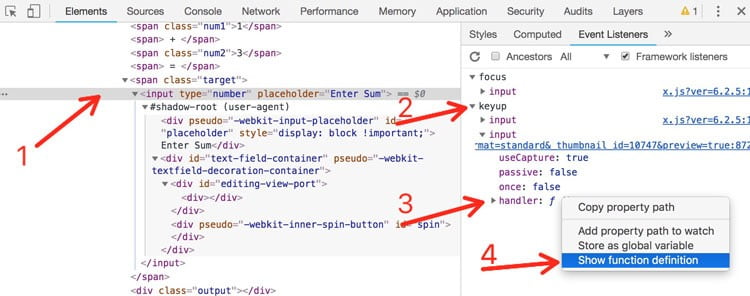
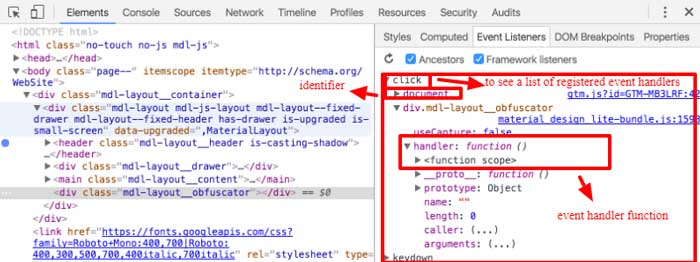
The top-level items in the Event Listeners pane show the event types that have registered listeners. Click the arrow next to the event type (for example click) to see a list of registered event handlers. Each handler is identified by a CSS selector-like element identifier, such as document or button#call-to-action. If more than one handler is registered for the same element, the element is listed repeatedly. You can right click on the handler to reveal further options such as Click the expander arrow next to an element identifier to see the properties of the event handler. The Event Listeners panelists the following properties for each listener as shown in (Picture 5.4)
Ancestor Event Listeners
When the Ancestors checkbox is enabled, the event listeners for the ancestors of the currently selected node are displayed, in addition to the currently selected node’s event listeners as shown in (Picture 5.5).

When the checkbox is disabled, only the event listeners for the currently selected node are displayed as shown in (Picture 5.6).

Framework listeners
Some JavaScript frameworks and libraries wrap native DOM events into their custom event APIs. In the past this made it hard to inspect the event listeners with DevTools, because the function definition would just reference back to the framework or library code. The Framework listeners feature solves this problem.
When the Framework listeners checkbox is enabled, DevTools automatically resolves the framework or library wrapping portion of the event code and then tells you where you actually bound the event in your own code as shown in (Picture 5.7).

When the Framework listeners checkbox is disabled, the event listener code will probably resolve somewhere in the framework or library code as shown in (Picture 5.8).

Quiz
[wp_quiz id=”10761″]
Having issue? comment below or click here to contact us

