 This topic discusses the concepts and terminology surrounding toast notifications, which are notifications that appear in the upper-right corner of your screen (upper-left corner for right-to-left (RTL) languages) to allow the app to communicate with the user whether the user is in another app, on the Start screen, or on the desktop. A toast can originate either from a local API call or from the cloud.
Working with toast templates
A toast notification can contain text and/or images, but secondary actions such as buttons are not supported. A toast can also play a system-defined sound when it displays. Toast notifications can be activated, dismissed, or ignored by the user. When a user taps or clicks the notification, the associated app is launched and the user can expect that the resulting view is related to the content of the notification. A toast notification should be used only for information of high interest to the user, typically involving some form of user opt-in. Therefore, it is a good choice for incoming IM chat requests, and information that the user has opted in to receive.
There are two types of toast notification:
- Standard toast: This toast remains on the screen for seven seconds, playing a brief sound to alert the user when it appears.
- Long-duration toast: This notification stays on the screen for 25 seconds and optionally can play longer, looping audio.
The elements of a toast notification are defined in the toast schema.
For a full list of available toast notification templates, with explanations of each, see Choosing a toast template.
Lets do it now!
1. Open visual studio 13 > New project > Visual C# > Blank App
2. In solution explorer, open MainPage.Xaml and add below lines of code to add a button.
<StackPanel>
      <Button Click="Button_Click">Show Toast Notification</Button>
</StackPanel>
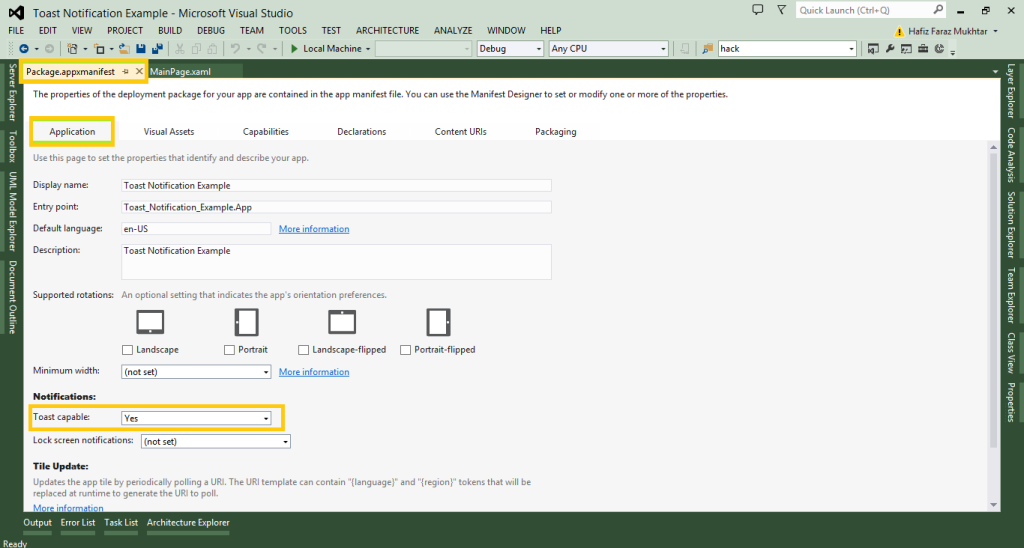
3. For your app to communicate through a toast notification, you must declare that it is Toast Capable in your windows store 8.1 app’s manifest file.
Manifest File > Application > Notification > Toast Capabe > Yes

4. Right click button code and select view definition, you will be navigated to button event handler event. Add following lines of code inside curly braces.
string toastXmlString = "<toast>"
                                   + "<visual version='1'>"
                                   + "<binding template='ToastText02'>"
                                   + "<text id='1'>MIC</text>"
                                   + "<text id='2'>Toast Notification Example</text>"
                                   + "</binding>"
                                   + "</visual>"
                                   + "</toast>";

            Windows.Data.Xml.Dom.XmlDocument toastDOM = new Windows.Data.Xml.Dom.XmlDocument();
            toastDOM.LoadXml(toastXmlString);

            // Create a toast, then create a ToastNotifier object to show
            // the toast
            ToastNotification toast = new ToastNotification(toastDOM);
            ToastNotificationManager.CreateToastNotifier().Show(toast);
Code explanation: string toastXmlString hold template of toast notification, which is available here. Next at
Windows.Data.Xml.Dom.XmlDocument it defines xml document object. toastDOM.LoadXml(toastXmlString); loads template and content to toastDOM (document object model). Finally last line shows toast notification.
Download Code by Mr. Usman-Ur-Rehman
Having any problem implementing above code? Click on this post title and comment below there.
