
Table of Contents
What is React?
In this 30 minute tutorial, we are going to learn React. React is a Javascript library for building user interfaces; developed by Facebook and is extremely popular these days.
What you should know?
Before you start learning React, you should have basic knowledge of:
- HTML
- CSS
- Javascript
- ES6
How to include react in HTML?
Including React in HTML is easy. You need to create an HTML file and:
- Create a <div id=”root”></div>
- Add two scripts in <head> tag
<html>
    <head>
        <title>React Project</title>
        <script src="https://unpkg.com/react@16.7.0/umd/react.development.js"></script>
        <script src="https://unpkg.com/react-dom@16.7.0/umd/react-dom.development.js"></script>
    </head>
    <body>
        <div id="root"></div>
    </body>
</html>
How to install React developer tools in Chrome?
React developer tool is for debugging React application in the Chrome browser. You can install it from here: React Developer Tools
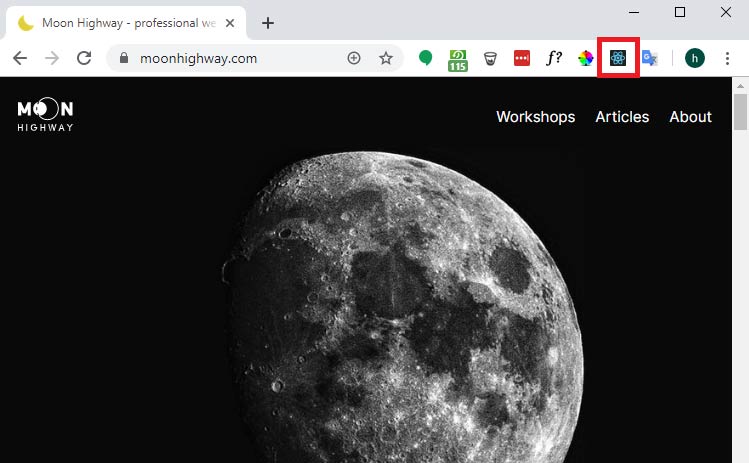
- To check if the extension is working correctly you can open any react based site, and extension icon will lit up (e.g moonhighway.com)
- React extension will show you all the elements that make up react page in Chrome Developer Tool (Ctrl + Shift + i / Cmd + Opt + i) under React tab (Component and profiler).
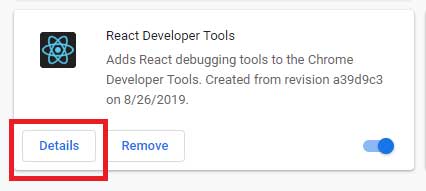
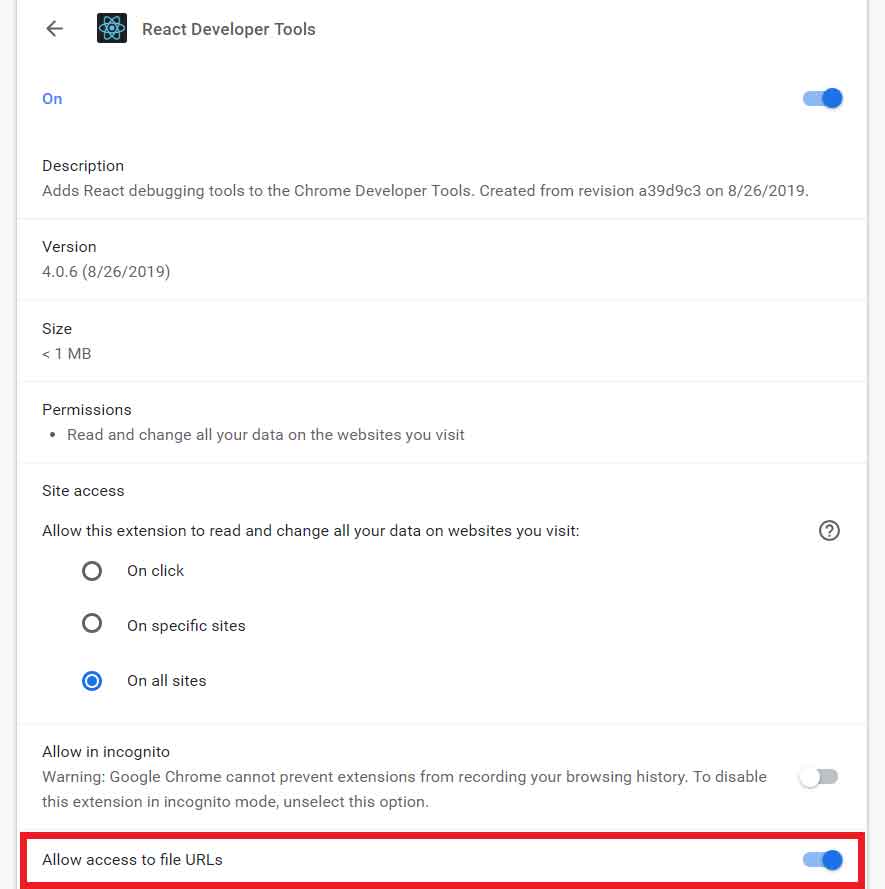
- Right now this extension won’t detect your React app(react icon will not lit up) because by default your project files are not accessible to this React chrome extension. To allow file access to react extension, open your chrome extension settings (as shown below), click on Details under the React extension and allow access to files URL. Refresh the react page and the extension icon will lit up.
- Your icon might show Red because it is not in production built, don’t worry about that for now.
How to create a React element?
Unlike HTML, we cannot simply create an HTML element/tag in React, instead we need a react function to create an HTML element. Let’s see how we can create an H1 element using react.
To create a React element:
- We need <script type=”text/javascript”></script> tag.
- Inside the script, we are going to use a render function (ReactDOM.render) to render a React element into the DOM. Inside React.DOM render function, we’re going to pass a couple of arguments.
- The first of which is (React.createElement). React.createElement is going to take in a few things:
- Type of element we want to create (e.g h1).
- Properties for the element, in this case, we don’t want to pass anything yet so we write null.
- What should be displayed inside the element (as shown in example code below).
- document.getElementById(“root”) is the second argument we have to pass that will state where to place the newly created element.
- The first of which is (React.createElement). React.createElement is going to take in a few things:
In this example, we will place h1 element inside <div id=”root”></div> using document.getElementById(“root”)
<html>
    <head>
        <title>React Project</title>
        <script src="https://unpkg.com/react@16.7.0/umd/react.development.js"></script>
        <script src="https://unpkg.com/react-dom@16.7.0/umd/react-dom.development.js"></script>
    </head>
    <body>
        <div id="root"></div>
        <script type="text/javascript">
            ReactDOM.render(
                React.createElement(
                    "h1",
                     null,
                    "Hello World"
                ),
                document.getElementById("root")
            );
        </script>
    </body>
</html>
How to create multiple nested React elements?
We can also create multiple nested React elements, consider the above example
- We are changing the “h1” tag to “div” and in the content part where “Hello World” is written, we are creating another react element using (React.createElement) as shown below.
So this way we can create multiple React Elements.
<script type="text/javascript">
  ReactDOM.render(
    React.createElement(
      "div",
      null,
      React.createElement("h1", null, "hello from the H1 inside a div")
    ),
    document.getElementById("root")
  );
</script>
Use JSX instead of React.createElement
JSX is a syntax extension to Javascript. Consider we want to render an unordered list and let’s say the unordered list will have 10 items. That would be a whole lot of React.createElement calls that would be prone to errors. For this purpose we use JSX or Javascript XML that allows you to write tags directly into javascript.
- First, we need to add babel to our scripts to transform JSX into a code that will work in the browser.
- Change the type of script tag from text/javascript to text/babel.
- We then replace (React.createElement) with simple h1 element.
<!DOCTYPE html>
<html>
    <head>
        <title>React Project</title>
        <script src="https://unpkg.com/react@16.7.0/umd/react.development.js"></script>
        <script src="https://unpkg.com/react-dom@16.7.0/umd/react-dom.development.js"></script>
        <script src="https://unpkg.com/@babel/standalone/babel.min.js"></script>
    </head>
    <body>
        <div id="root"></div>
        <script type="text/babel">
            ReactDOM.render(
                <h1>Hello World</h1>,
                document.getElementById("root")
            );
        </script>
    </body>
</html>
Using JSX Variable/Expression in React
Declaring a variable and then using it inside JSX by wrapping it in curly braces is called a JSX expression.
Consider the above example. Let’s replace Hello World with a JSX expression. We will:
- Create a variable called city and set its value, and instead of <h1>Hello World</h1> we will write <h1>Hello {city}</h1> with the variable name in curly braces.
- Create an internal stylesheet to change the color to purple.
- Add className = “heading” in the h1 tags
<!DOCTYPE html>
<html>
    <head>
        <title>React Project</title>
        <script src="https://unpkg.com/react@16.7.0/umd/react.development.js"></script>
        <script src="https://unpkg.com/react-dom@16.7.0/umd/react-dom.development.js"></script>
        <script src="https://unpkg.com/@babel/standalone/babel.min.js"></script>
        <style>
            .heading {
                color: purple;
            }
        </style>

    </head>
    <body>
        <div id="root"></div>
        <script type="text/babel">
            let city = "Madrid";
            ReactDOM.render(
                <h1 className="heading">Hello {city}</h1>,
                document.getElementById("root")
            );
        </script>
    </body>
</html>
- Note: You may think that this should be class, not className. But Class keyword is reserved in javascript, so in JSX we use className.
React Components
A component lets you put together a user interface with independent reusable pieces. The process of composing components is what React is all about. Conceptually, components are like JavaScript functions. They accept arbitrary inputs (called “props”) and return React elements describing what should appear on the screen.
Create a Function Component
The simplest way to define a component is to write a JavaScript function. Let’s take an example:
- So we’ll create a new function with a name Hello (as shown below)
- This function will return the H1 tag. The H1 will just say “Welcome to react”
- Now, instead of rendering H1 in ReactDOM.render(), we’re going to replace this with the Hello component.
- We can do this by using the name of the component as a tag in the render function (E.g. <Hello />).
Note: The first letter of the component name must be uppercase. Otherwise, the console will show you an error.
<script type="text/babel">
  const Hello = () => {
    return (
      <div className="heading">
        <h1>Welcome to React</h1>
      </div>
    );
  };
  // Notice H is capital in component name Hello
  ReactDOM.render(<Hello />, document.getElementById("root"));
</script>
What are React props?
Props is an object in React that contains properties about the component. With props, we can display dynamic data within a component. So the props are always going to be sent into these component functions.
So now
- We will set the component properties(props) and its values in the render function as shown below.
Now, instead of using Welcome to React, we’ll say Welcome to {library}
<script type="text/babel">
  const Hello = ({ library, message }) => {
    return (
      <div className="heading">
        <h1>Welcome to {library}</h1> <p>{message}</p>
      </div>
    );
  };
  ReactDOM.render(
    <Hello library="React" message="Enjoy!" />,
    document.getElementById("root")
  );
</script>
React Class Component
In comparison to function component, React class component has some additional features. React class components offer methods like the class constructor(primarily used in React to set initial state or to bind methods) and the mandatory render method to return JSX as output. It is just like a JavaScript class.
Now we are going to create a React class component using JavaScript class.
- So, let’s go ahead and create a function component called lake.
-
- Lake is going to take in the name property, and it’s going to return an h1 that displays that name (as shown below).
-
- Create a class component named App (as shown below)
-
- Class component can have a constructor, states, methods, and variables.
- HTML code is written in the render method.
- Render is going to return what should be rendered.
-
- The app component is going to return a <div> and components of lake <Lake /> that we just created.
- We can set the values of the name property in the class component.(as shown below)
- The app component is rendering our lake component, and then we’re passing down name as a property.
<script type="text/babel">
  const Lake = ({ name }) => <h1>{name}</h1>;
  class App extends React.Component {
    render() {
      return (
        <div>
          <Lake name="Lake Tahoe" />
          <Lake name="Angora Lake" />
          <Lake name="Shirley Lake" />
          <Lake name="Cathedral Lake" />
        </div>
      );
    }
  }
  ReactDOM.render(<App />, document.getElementById("root"));
</script>
React State and Events
State:
One of the most important concepts in React is State. When a component’s state data changes, the render function will be called again to re-render the state change. Let’s go ahead and add some State to our component.
- Add (logged in) value in the state and we set it to true initially.
- Now inside the render we add a “div” which has a conditional IF statement to see if the state is true or not
- If we change the state value from true to false it will say logged out else it says logged in.
<script type="text/babel">
    const Lake = ({name}) => <h1>{name}</h1>;
    class App extends React.Component {
        state = {
            loggedIn: false
        }
        render() {
            return (
                <div>
                    <div>The user is {this.state.loggedIn ? "logged in" : "not logged in"}.</div>
                    <Lake name="Lake Tahoe" />
                    <Lake name="Angora Lake" />
                    <Lake name="Shirley Lake" />
                    <Lake name="Cathedral Lake" />
                </div>
            )
        }
    }
    ReactDOM.render(
        <App />,
        document.getElementById("root")
    );
</script>
Events:
Handling events with React elements is very similar to handling events on DOM elements. There are some syntactic differences:
- React events are named using camelCase, rather than lowercase.
- With JSX you pass a function as the event handler, rather than a string.
Now, we’ll take a closer look at how to bind event functions to UI elements.
- Let’s take the same example, add local method called login to this component. We’re going to use this to trigger a change in state.
- We’re going to use this.setState and say loggedIn is true. This will change the state value to true
- We will add a button next to div. The button is going to say Log In.
- Add an on click handler to this. So onClick={this.logIn}.
Add another function for log out. And we’ll say this.setState and set loggedIn is false. Create a button for logout.
<script type="text/babel">
  const Lake = ({ name }) => <h1>{name}</h1>;
  class App extends React.Component {
    state = {
      loggedIn: false
    };
    logIn = () => this.setState({ loggedIn: true });
    logOut = () => this.setState({ loggedIn: false });
    render() {
      return (
        <div>
          <button onClick={this.logIn}>Log In</button>
          <button onClick={this.logOut}>Log Out</button>
          <div>
            The user is {this.state.loggedIn ? "logged in" : "not logged in"}.
          </div>
          <Lake name="Lake Tahoe" />
          <Lake name="Angora Lake" />
          <Lake name="Shirley Lake" />
          <Lake name="Cathedral Lake" />
        </div>
      );
    }
  }
  ReactDOM.render(<App />, document.getElementById("root"));
</script>
Render Components from a list
One of the really cool things about React is as your data changes, as it becomes more dynamic, you can use React to render the correct number of elements based on whatever your data is. Let’s take a list for an example.
- Create a const called lakeList and this will be an array of lake (as shown below).
- We add this to the render function to send as a prop to app component.
- Now we create a function component for App which receive a property named lakes from the render function
- In the function we will add an unordered list <ul>.
- So based on the items that are in our array, we will create list items for each. and then we’re going to map over those items.
(The map method creates a new array with the results of calling a provided function on every element in the calling array.)
So when we map over them, it means, for each of these lakes we want to display each of their names in an <li>.(as shown below)
<!DOCTYPE html>
<html>
  <head>
    <title>React Project</title>
    <script src="https://unpkg.com/react@16.7.0/umd/react.development.js"></script>
    <script src="https://unpkg.com/react-dom@16.7.0/umd/react-dom.development.js"></script>
    <script src="https://unpkg.com/@babel/standalone/babel.min.js"></script>
    <style>
      .heading {
        color: purple;
      }
    </style>
  </head>
  <body>
    <div id="root"></div>
    <script type="text/babel">
      const lakeList = ["Echo Lake", "Maud Lake", "Cascade Lake"];
      const App = ({ lakes }) => (
        <ul>
          {lakes.map(lake => (
            <li>{lake}</li>
          ))}
        </ul>
      );
      ReactDOM.render(
        <App lakes={lakeList} />,
        document.getElementById("root")
      );
    </script>
  </body>
</html>
If we open up our console, we see a warning here. It says each child in an array or iterator should have a unique key property. This is because, whenever we’re rendering some sort of a list, with dynamic values, we’re going to need to give each a key
- In a list, we have to give a key by adding a variable in the mapping method.
- For each time we loop through these list items, we’re going to get a value for the variable, and we’re going to set that value to the key.
const App = ({lakes}) => (
  <ul>
    {lakes.map((lake, i) =>
      <li key={i}>{lake}</li>
    )}
  </ul>
)
Render Components from a list of objects
In the above example, we saw how to iterate over a list and display different elements based on the data in that list. What if, instead of strings we’ve objects in our data set.
Let’s take the above example and see how to iterate over a list of objects.
- We will create a list with object. The object will have an ID, a name and a trailhead (as shown below).
- When we refresh, nothing will render because in the list we included objects instead of strings.
- So now we have to pull the data off of each of these keys for this we use dot.
- Like {lake.name} and {lake.trailhead} (as shown below).
Now, instead of creating a new key, everytime we map over the list, we can use objects id.
<!DOCTYPE html>
<html>
    <head>
        <title>React Project</title>
        <script src="https://unpkg.com/react@16.7.0/umd/react.development.js"></script>
        <script src="https://unpkg.com/react-dom@16.7.0/umd/react-dom.development.js"></script>
        <script src="https://unpkg.com/@babel/standalone/babel.min.js"></script>
    </head>
    <body>
        <div id="root"></div>
        <script type="text/babel">
            const lakeList = [
                {id: 1, name: "Echo Lake", trailhead: "Echo Lake"},
                {id: 2, name: "Maud Lake", trailhead: "Wright's Lake"},
                {id: 3, name: "Cascade Lake", trailhead: "Bayview"}
            ];
            const App = ({lakes}) => (
                <ul>
                    {lakes.map(lake =>
                        <li key={lake.id}>{lake.name} | Trailhead: {lake.trailhead}</li>
                    )}
                </ul>
            )
            ReactDOM.render(
                <App lakes={lakeList}/>,
                document.getElementById("root")
            );
        </script>
    </body>
</html>
Install and Create React app
Up till now, we’ve been using an html file for our entire React project. This method is good for testing and getting comfortable with React, but to setup a full-fledged project you can use a tool called Create React App.
Create React App will let you set up a React project with all of the tooling setup and everything you need to get started, without having to do anything.
To install react :
- You need to have npm. If you want to check your version, open up your terminal and run npm -v to check your version or you can install node here NodeJs
- Go ahead and run npm install -g create-react-app
PS C:\Users\Lenovo\Desktop> npm install -g create-react-app
Go to the folder you want to create your project in. Run the command create-react-app “appname”, this can take a few seconds to install all the necessary packages.
PS C:\Users\Lenovo> cd Desktop
PS C:\Users\Lenovo\Desktop> create-react-app react-practice
Open VScode editor or whatever IDE you prefer and open the project that you just created
PS C:\Users\Lenovo\Desktop> cd react-practice
PS C:\Users\Lenovo\Desktop\react-practice> npm start
Now inside the Terminal you can start the server by going the project directory and run the command npm start. This will open up your default browser and you will see react logo page.
Setup your React Project
- Go to the public folder and open the file index.html. The div with an id=root is where your file is going to render, as shown in the picture below.
- Now, navigate to src/index.js and you can see, a component named <App /> is being rendered to an element with an id=”root”
- This <App /> is imported from the same directory from a file named App.js. This is the file where we place our components.
So, basically this App.js is what your homepage is displaying in the browser. Edit this file accordingly, and save to see changes in the browser

