

- Generating Idea & Game Design (characters, scenes and stuff)
- Creating Unity Project – GIT
- Animation in Unity
- Unity Programming(Part 1)
- How to make money from game
- Publishing game on app stores (Microsoft Windows phone, windows store, android)
- Marketing Tactics
- What’s next
In the previous tutorial, we generated game idea, designed game and looked at important aspects of starting game development from scratch. In this unity 2d tutorial, we shall be looking at best practice for setting up unity project, how to use GIT for unity projects and folder hierarchy, how to create scene in unity3d and finally import game designs into unity editor.
Table of Contents
What you need to know?
- GIT icon-external-link
- What is GIT and why use it? Its a version control software. E.g you have a text file in which you made some changes and saved the file. Next day you realized that you did wrong. Now you want to restore that text. How would you do this? Answer is GIT. GIT keeps track of file modifications and let you modify changes and alot other useful features.
- Unity
- You have it. I’m using version 4.3.2 for this particular tutorial series.
Unity 2D Game tutorials list:
This complete game development series is divided into following different parts:
- Generating Idea & Game Design (characters, scenes and stuff)
- Creating Unity Project – GIT
- Animation in Unity
- Unity Programming(Part 1)
- How to make money from game
- Publishing game on app stores (Microsoft Windows phone, windows store, android)
- Marketing Tactics
- What’s next
Creating project
I assume that you have downloaded and installed unity. Time to start unity, double click unity and you will see a dialog box like this: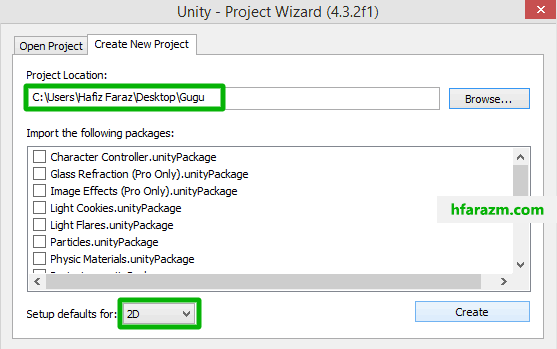
Here I have done three simple things: 1. Clicked on “Create New Project” 2. Define project location i.e Desktop/gugu 3. Then told unity that I want 2D project NOT 3D because this is what we promised in previous tutorial. Finally clicked create button. Now you will see unity’s interface.
At this point you have two choices:
- Use a version control software to keep track of changes and versions of your game (recommended) icon-check-circle
- Don’t use version control software. Do not keep track and if something goes wrong then you cannot go back. If so you can scroll down and start reading from “Folder hierarchy” section.
Now lets just make some arrangements for our game project: Goto Edit > Project Settings > Editor and you will see following type of panel at right side: 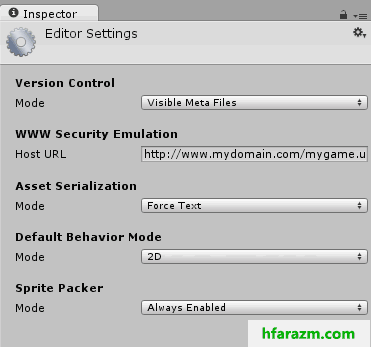 You need to change your editor settings as shown in above pic.
Version Control: As said earlier GIT is used for version control so GIT needs to have a metafile with which it can detect modifications in game. That is why I selected visible metafiles.
- Edit by thelastborn: You want visible
.metafiles..metaare generated by Unity during import for every single file and folder under Assets. They are text files (YAML format) which essentially contain the Inspector settings for that asset. These need to be tracked by version control.
WWW Security Emulation: is particularly useful when you are developing game for web browsers which in our case is not applicable because we are targeting mobiles and windows store. So leave it as it is or if you want to dig deep then read here icon-external-link
Asset Serialization: As the name depicts keeps track of assets such as images… so we need to have serialization mode set to Force text so that our GIT application can understand difference(will talk about GIT in a moment).
- Edit by thelastborn: Force text asset serialization. I’m assuming this is no longer a Pro-only feature. This basically causes Unity asset files, like scenes or prefabs, to be text files (again, YAML format) instead of binary. Again, this is important for version control, so diffs can be tracked.
Default Behaviour Mode: This is what we selected earlier i.e type of our project.
Sprite Packer: When you are developing game, performance and optimization plays a vital role. Sprite Packer minimizes extra space between images so that extra processing can be saved and images can be packed tightly. In general, you can say sprite as image.
Another change: Goto Edit > Preferences > Packages > Repository > select External
What is external? Basically we are telling unity that our project will be monitored by an external program(GIT). Thats it for project.
Getting started with GIT
At this point, I assume that you have downloaded and installed GIT. Now first step is to open “GIT Bash” at your system. You will see a black window with some command prompt/terminal. This is where we will be initializing GIT and then tracking down changes. So let have a look at what I did in GIT Bash:
Explanation: Encircled numbers tells that I have entered some code in that particular line. 1 says that, change working directory to Desktop/GUGU. This is where our project resides. 2 says that, initialize GIT which means start tracking changes in that particular folder which we defined in step 1. 3 says that, tell me the status of what GIT is getting back from that directory.
Now the red part:What is it? They are folders which GIT doesn’t recognize as they are not yet added to staging index – they are currently in working directory. To explain, GIT has following three parts:
Working Directory: This is where things go in the beginning or when you modify some files in your project. So GIT tells that you have made some changes to working directory which are not yet added to staging index.
Staging Index: This is second stage. If you have modified or made some changes to files in working directory then you need to tell GIT to index those changes (we will do it in a moment).
Repository: This is the third stage. When you are done with indexing you are then ready to commit(save) changes – this is where you think your project is now working as desired and you tell GIT that ok take care of my project files.
The issue: We don’t need every folder to be part of our game project repository because some of them are unnecessary and may cause problems later. To ignore such files/folder in GIT we add a file called “.gitignore” (yeah thats the name of the file with dot) in our project to tell GIT what to track and what not to. Lets create a text file named as “.gitignore” (make sure this file doesnt have any extension such as .txt or .doc) and then add following code to .gitignore:
# =============== #
# Unity generated #
# =============== #
Temp/
Library/

# ===================================== #
# Visual Studio / MonoDevelop generated #
# ===================================== #
ExportedObj/
obj/
*.svd
*.userprefs
/*.csproj
*.pidb
*.suo
/*.sln
*.user
*.unityproj
*.booproj

# ============ #
# OS generated #
# ============ #
.DS_Store
.DS_Store?
._*
.Spotlight-V100
.Trashes
ehthumbs.db
Thumbs.db
You have to place .gitignore file to root of your project. This file ignored above mentioned files and folder.
Edit by thelastborn:.gitignore– You want to make sure your VCS ignores Library. This is the most important one. In addition, the general rule is, ignore anything outside of Assets and ProjectSettings, such as IDE files or anything automatically generated during your workflow that’s unique to your machine, unless you have special need to distribute them. This isn’t particularly necessary, but it prevents your git client from reporting untracked files, which can clog up commits, merges, branch changes, etc.
Now come back to GIT Bash and write again following code:
git status
You will notice that “Library” and “Temp” folders are no more appearing in red thats because we ignored them in .gitignore file. The only folders we need to track for unity project are assets folder and ProjectSettings.
One quick question: The files/folders you see in red color, where are they?
- Working Directory icon-check-circle
- Staging Index
- Repository
Well I answered, yes it is in working directory. So you know the next step i.e add them to staging index. Lets do this by writing following code:
git add .
Explanation: “.” at the end means ALL. Above code tells GIT to add all items which are in working directory to Staging Index.
Committing code: This means we are now ready to commit changes to repository. Lets do this by writing following code in GIT Bash:
git commit -m "Empty unity project"
Explanation: -m is for message. When we are committing over and over again then it becomes difficult for us to identify what we committed a week ago, To overcome this issue we attach a short message with commit so that we can recognize the commit later. How to see commits? You need to enter following code in GIT Bash for this:
git log
ann now you will see your commit in repository like this: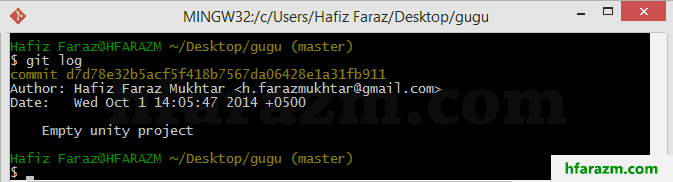
You are done with your first commit. Now lets create folder hierarchy.
Folder Hierarchy – Unity Project
When project gets bigger then it becomes difficult to manage all assets (such as sprites, sounds, scripts etc). Its a good practice to place different item types in their respective folders. So lets create following folders in Assets Folder:
- animations
- fonts
- materials
- prefabs
- scenes
- scripts
- sounds
- textures
Importing Game Design into Untiy
In the previous tutorial, we designed game objects, character and buttons etc. Time to place them in out project. In unity, goto Project > Assets > textures right click on textures and click on Import new assets like this: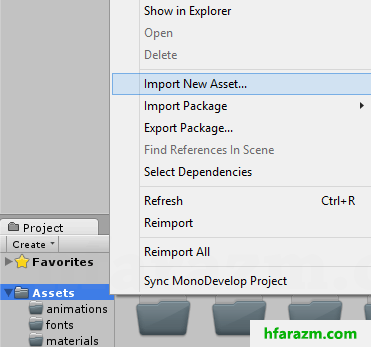
Correction: Though in above pic, I have right clicked on Assets, you need to click on textures folder under assets and then click on Import new asset.. then select the image file that we designed in previous tutorial and click ok.
Saving: By default, when you start unity, you get a blank scene. You need to save that scene by pressing Ctrl+Shift+S and save it Assets > Scenes folder. After that save your project from File > Save project.
In this tutorial, you grabbed how to use git with unity and creating project with proper folder hierarchy and importing game design to your unity project. Next we will add images to scene and will prepare our first scene. I have skipped the build settings (will talk about it in later).
Hope you like it. Please share my work. Wait for next tutorial.


//